Adjusting Bright Field Images
Processing a bright field image mainly consists of adjusting the contrast and the brightness to improve the quality of the image. Cytosketch provides tools that make adjusting these images substantially faster, easier and more consistent.
The adjustments to the image are non-destructive, this means that the adjustments do not degrade the quality of the image and it means that you can always reset the adjustments to the original values.
This section describes the various ways to adjust bright field images in Cytosketch.
Table of Content
- Bright Field Image Controls Overview
- Automatically Adjusting Images
- Adjusting Contrast
- Automatically Adjusting Brightness
- How to Get Back to the Original Image
- Converting a Bright Field Image into a Merged Fluorescent Image
- Converting a Bright Field Image into a Single Fluorescent Channel
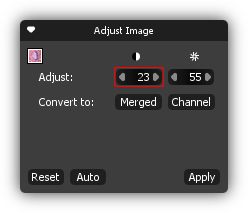
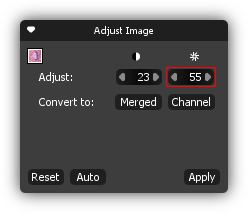
Bright Field Image Controls Overview
This section provides a quick overview of the controls that are available in the Adjust Image box when adjusting bright field images. Move the mouse over the screen shot below to see a short description of the individual controls or over the description to see the corresponding controls on the screen shot.

|
|
Automatically Adjusting Images
It's easy - select the images to adjust and click the Auto button
![]() in the Adjust Image box or press +
simultaneously.
in the Adjust Image box or press +
simultaneously.
Adjusting Contrast
Select the image to adjust and then use the controls in the Adjust Image box to adjust the contrast.
Automatically Adjusting Brightness
- Select the image to adjust, go to and then select or press + simultaneously.
- To fine tune the brightness use the controls in the Adjust Image box.
How to Get Back to the Original Image
- Select the image to reset.
-
Click
 in the Adjust Image box
and the adjustments values are reset to the original values.
in the Adjust Image box
and the adjustments values are reset to the original values.
Converting a Bright Field Image into a Merged Fluorescent Image
Converting a bright field image to a merged fluorescent image is useful if you want to adjust each channel individually or if you have accidently imported your fluorescent image as a bright field image.
- Select the image.
- Click the Merged button
 in the Adjust Image box.
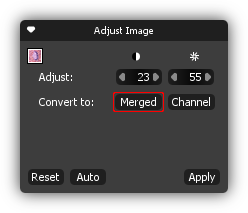
Tip:
For an overview of the fluorescent image control box have a look at Adjusting Fluorescent Images.
Converting a Bright Field Image into a Single Fluorescent Channel
Converting a bright field image to a single fluorescent channel is useful if you have accidently imported your single channel image as a bright field image.
- Select the images by using the selection tool
 .
.
- Click the Channel button
 in the Adjust Image box.
The channel with the brightest color is extracted from the bright field image.
in the Adjust Image box.
The channel with the brightest color is extracted from the bright field image.
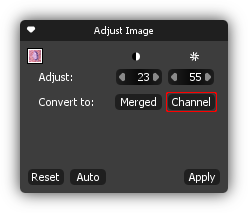
Tip:
Use the Split button ![]() in the tool bar
to split the image into separate channels while retaining the bright field image.
in the tool bar
to split the image into separate channels while retaining the bright field image.